
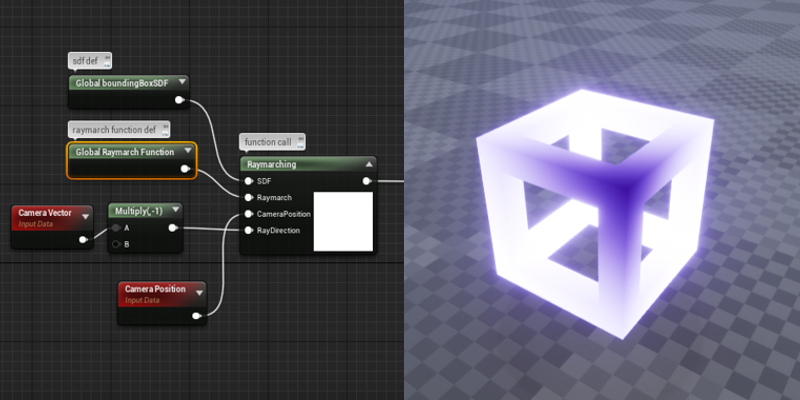
Recently I’ve been playing with raymarching technique and trying to implement it in Unreal Engine material editor. As the algorithm requires a for loop meaning it can only be done using HLSL code with the Custom Node.
There are many pitfalls using custom node especially when the code is getting complex. The details panel code editor is very primitive so we want to edit the code over in like VSCode; also more options added into the panel and I barely used before – here I documented some of my research and tests for future reference.
New custom node options
An example:
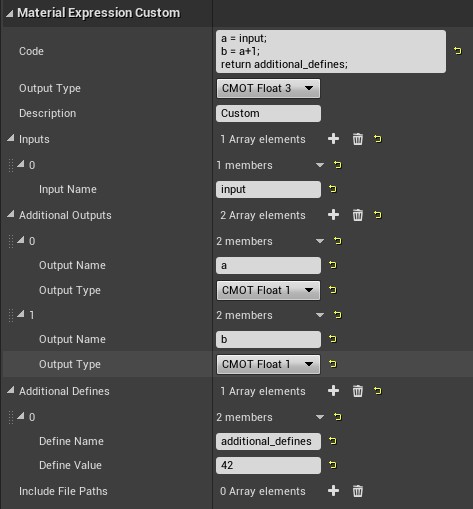
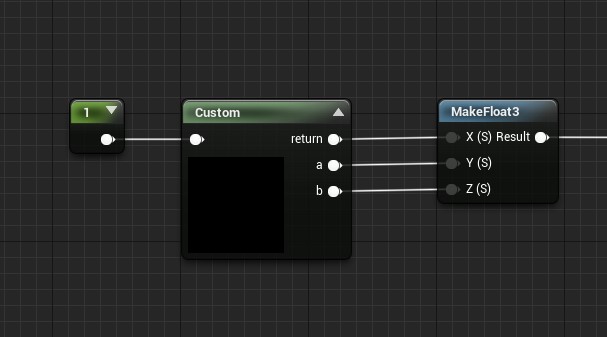

Here is the generated code below. (See the generated code at Window -> HLSL Code in the Material Editor.) Note that FMaterialPixelParameters Parameters got passed in by the compiler as an additional secret input.
#ifndef additional_defines
#define additional_defines 42
#endif//additional_defines
MaterialFloat3 CustomExpression0(
  FMaterialPixelParameters Parameters,
  MaterialFloat input,
  inout MaterialFloat a,
  inout MaterialFloat b)
{
a = input;
b = a+1;
return b;
}
This is super helpful in troubleshooting because you can see all of the auto-generated boilerplate code that gets included in the final shader. You can also look at the code at
C:\Program Files\Epic Games\UE_4.27\Engine\Shaders- lots of good stuff in there.
^ More digging in next post! :)
Creating Global Functions (Hacks!)
The compiler will literally copy-paste the text in a Custom node into a function called CustomExpressionX like:
MaterialFloat3 CustomExpression0(FMaterialPixelParameters Parameters)
{
  return 1; // return 1 is essential!
}
Based on this a hack can be done by type in code like this:
//MaterialFloat3 CustomExpression0(FMaterialPixelParameters Parameters)
//{
    return 1;
  }

  float MyGlobalVariable;

  float MyGlobalFunction(float a)
  {
    return a;
//}
You can see the trick on curly brackets breaks down the function and defined MyGlobalVariable and MyGlobalFunction() in the global namespace. (Hacky but cool!)
#include shader code
Issues
Obviously we want to use the Include File Paths option in details panel. But this easily triggers some errors like (say you put your shader at a dummy path /Project/a.usf):

[SM5] Can't map virtual shader source path "/Project/a.usf".
Directory mappings are:
  /Engine -> D:/Program Files/Epic Games/UE_4.27/Engine/Shaders
[SM5] /Engine/Generated/Material.ush(2080): error: Can't open include file "/Project/a.usf"
  #include "/Project/a.usf"
  from /Engine/Private/BasePassVertexCommon.ush: 15:    #include "/Engine/Generated/Material.ush"
  from /Engine/Private/BasePassVertexShader.usf: 7:    #include "BasePassVertexCommon.ush"
  from /Engine/Private/BasePassPixelShader.usf: 38:    #include "/Engine/Generated/Material.ush"
[SM5] 1 error in preprocessor.
UE is expecting you putting custom node hlsl code (.usf or .ush) at /Engine -> D:/Program Files/Epic Games/UE_4.27/Engine/Shaders which is not very convenient - what if I want my shader shipped with my project?
Modify C++ Code
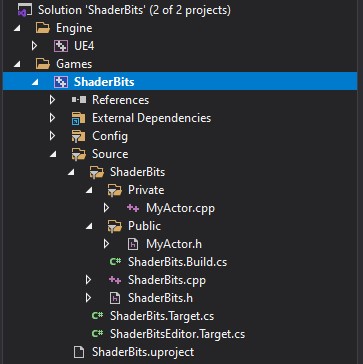
Convert current project into C++ project by creating a new dummy C++ class and compile(I created one called MyActor inherited from Actor base class.).
You may need to right click the .uproject file icon and and Generate Visual Studio Project Files for the project to load correctly into Visual Studio and compile.
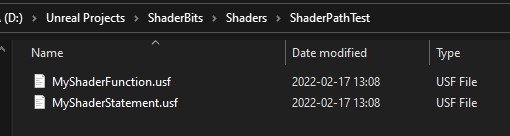
Create a folder called Shaders at the same level as Content folder in the project directory.
Add RenderCore to array of public dependency modules in the <project>.build.cs file:
using UnrealBuildTool;
public class ShaderBits : ModuleRules
{
	public ShaderBits(ReadOnlyTargetRules Target) : base(Target)
	{
		PCHUsage = PCHUsageMode.UseExplicitOrSharedPCHs;

		PublicDependencyModuleNames.AddRange(new string[] { "Core", "CoreUObject", "Engine", "InputCore", "RenderCore" }); // add "RenderCore"!

		PrivateDependencyModuleNames.AddRange(new string[] {  });

		// Uncomment if you are using Slate UI
		// PrivateDependencyModuleNames.AddRange(new string[] { "Slate", "SlateCore" });

		// Uncomment if you are using online features
		// PrivateDependencyModuleNames.Add("OnlineSubsystem");

		// To include OnlineSubsystemSteam, add it to the plugins section in your uproject file with the Enabled attribute set to true
	}
In <project_name>.h file add a new module with a StartupModule() function overrides:
#pragma once
#include "CoreMinimal.h"
#include "Modules/ModuleManager.h" // include this!

class FShaderBitsModule : public IModuleInterface
{
public:
	virtual void StartupModule() override;
	virtual void ShutdownModule() override;
};
In <project_name>.cpp, add the StartupModule() override With the definition of the added shaders path, and mapping this new path as /Project.
Lastly in macro IMPLEMENT_PRIMARY_GAME_MODULE replace FDefaultGameModuleImpl with FShaderBitsModule.
#include "ShaderBits.h"
#include "Modules/ModuleManager.h"
#include "Interfaces/IPluginManager.h"
#include "Logging/LogMacros.h"
#include "Misc/Paths.h" // include this!

void FShaderBitsModule::StartupModule()
{
	//#if (ENGINE_MINOR_VERSION >= 21)
	FString ShaderDirectory = FPaths::Combine(FPaths::ProjectDir(), TEXT("Shaders")); // add this!
	AddShaderSourceDirectoryMapping("/Project", ShaderDirectory);
	//#endif

}

void FShaderBitsModule::ShutdownModule(){}

//IMPLEMENT_PRIMARY_GAME_MODULE( FDefaultGameModuleImpl, ShaderBits, "ShaderBits" );
IMPLEMENT_PRIMARY_GAME_MODULE(FShaderBitsModule, Project, "Project"); // edit this!
Include shader code
Then you can create your shaders at /<Project>/Shaders like:
and include the shader file:
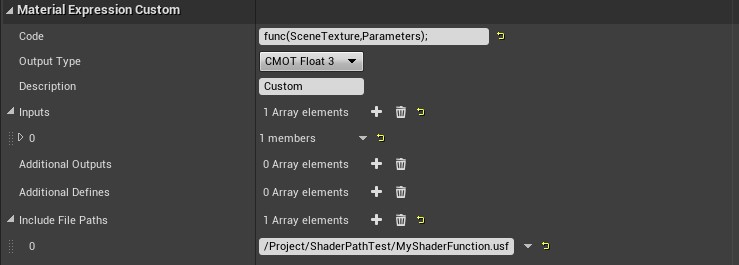
Note that you may need to call the function explicitly.
Or you can include directly in the code block:
#include "/Project/ShaderPathTest/MyShaderStatement.usf"
return 1;
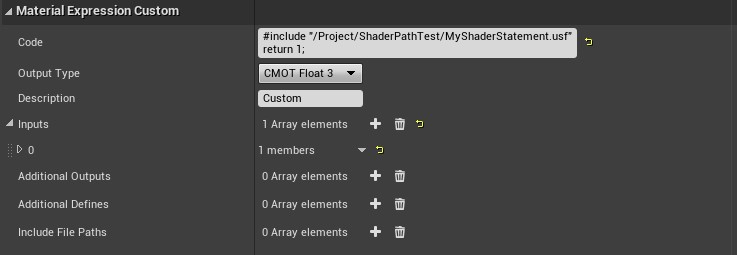
Note that you need the return 1; in this case to let the compiler know it is a valid function.
Check the generated code you will see the difference in nuance:
MaterialFloat3 CustomExpression0(FMaterialPixelParameters Parameters,MaterialFloat4 SceneTexture)
{
#include "/Project/ShaderPathTest/MyShaderStatement.usf"
return 1;
}
#include "/Project/ShaderPathTest/MyShaderFunction.usf"
MaterialFloat3 CustomExpression0(FMaterialPixelParameters Parameters,MaterialFloat4 SceneTexture)
{
return func(SceneTexture,Parameters);;
}
Then after editing code in external editor and save, in the material editor add a newline to the code (shift-enter) to trigger a recomplie and click the Apply button.
Define Multiple Functions inside UE4’s Custom Node
Custom nodes wrap your code inside CustomExpression#() functions, and that normally prohibits defining your own functions.
However, there seems to be a barely documented feature in HLSL that allows defining functions (methods) inside struct definitions. struct definitions can be nested inside functions.
struct Functions
{
  float3 OrangeBright(float3 c)
  {
      return c * float3(1, .7, 0);
  }
  float3 Out()
  {
    return OrangeBright(InColor);
  }
};
Functions f;
return f.Out();
The cool part is, this is all happening inside your own effective namespace, not interfering with Unreal’s USF files, and the compilation is Fast for iteration.
So now, you can start to build a library of custom functions, and more complex shaders.
It seems HLSL is prohibiting defining a struct nested inside a struct, so make sure to define your custom structs above and outside struct Functions.
Reference
- Creating a Gaussian Blur
- https://forums.unrealengine.com/t/extending-custom-hlsl-custom-expressions/88820
- https://forums.unrealengine.com/t/custom-hlsl-tips/104760
- https://odederell3d.blog/2021/03/22/ue4-loading-shaders-from-within-the-project-folder/
- https://forums.unrealengine.com/t/virtual-shader-source-path-link-custom-shaders-shadertoy-demo-download/119996