Getting started to use Shadertoy to learn and practice GLSL. Here are the first few examples I’ve been playing around. Also got the shaders embedded in my blog page. Here I documented some of my exploration about the website and some best-practice.
Shadertoy First Try
Watercolor Blending
Made a simple shader iterating a combination of sine and cosine functions with UV coordinate to achieve a watercolor blending effect. Shader is very simple but the final look is very organic.
* Use mouse click and drag to interact with the motion.
void mainImage( out vec4 fragColor, in vec2 fragCoord )
{
    float speed = .1;
    float scale = 0.002;
    vec2 p = fragCoord * scale;
    for(int i=1; i<10; i++){
        p.x+=0.3/float(i)*sin(float(i)*3.*p.y+iTime*speed)+iMouse.x/1000.;
        p.y+=0.3/float(i)*cos(float(i)*3.*p.x+iTime*speed)+iMouse.y/1000.;
    }
    float r=cos(p.x+p.y+1.)*.5+.5;
    float g=sin(p.x+p.y+1.)*.5+.5;
    float b=(sin(p.x+p.y)+cos(p.x+p.y))*.5+.5;
    vec3 color = vec3(r,g,b);
    fragColor = vec4(color,1);
}
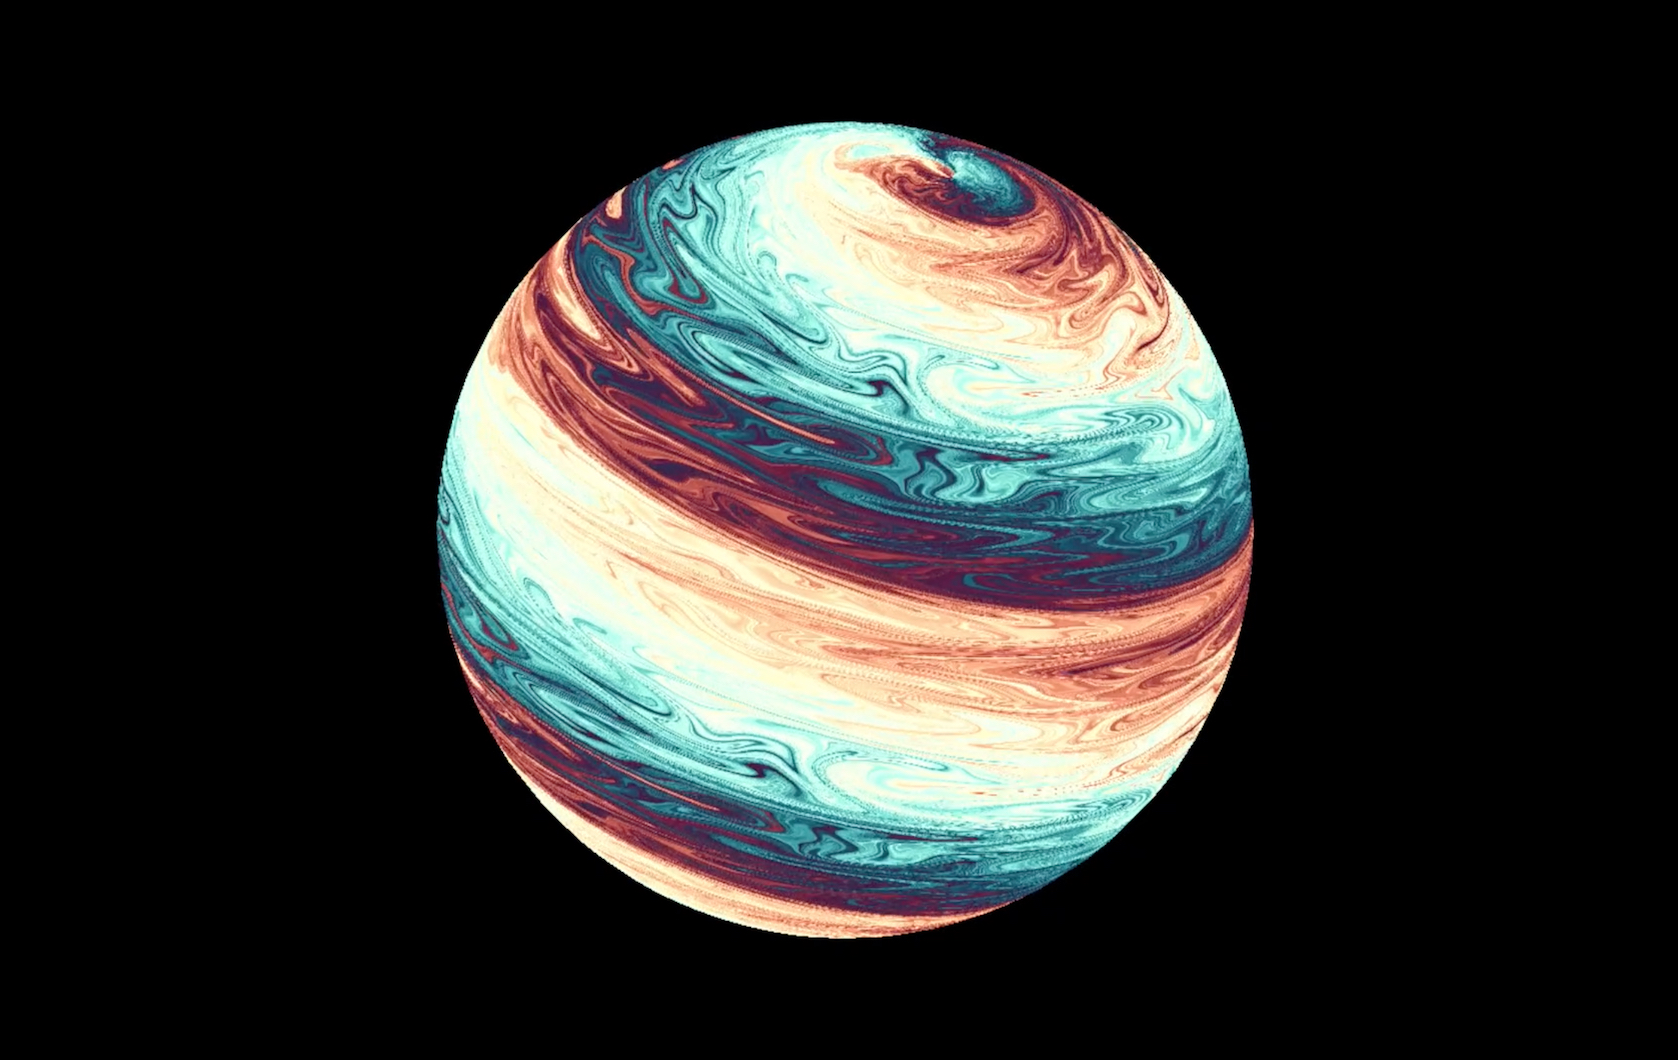
Jupiter
I then take the watercolor blending shader to the next level - mapping the final color output onto a UV sphere and added scrolling and stretching motion. The final looking is just like a Jupiter planet.
Later I added lighting model and background to make it more realistic. It is amazing to see how much a simple uv distortion can achieve.
Shadertoy Basics
Shadertoy is a online community and real-time browser tool for creating and sharing GLSL shaders. It provides the boilerplate code for GLSL shader programming so that we can just jump onto the most creative part of graphic programming. We can also get access to thousands of shaders written by Computer graphics professionals, academics and enthusiasts, and learn by tweaking their code.
Nice reference sites
- Fabrice’s SHADERTOY – UNOFFICIAL
- Fabrice’s SHADERTOY – UNOFFICIAL - Usual tricks in Shadertoy / GLSL
- Official How-To
Boilerplate Code
// Shader Inputs, uniforms
uniform vec3      iResolution;           // viewport resolution (in pixels)
uniform float     iTime;                 // shader playback time (in seconds)
uniform float     iTimeDelta;            // render time (in seconds)
uniform int       iFrame;                // shader playback frame
uniform float     iChannelTime[4];       // channel playback time (in seconds)
uniform vec3      iChannelResolution[4]; // channel resolution (in pixels)
uniform vec4      iMouse;                // mouse pixel coords. xy: current (if MLB down), zw: click
uniform samplerXX iChannel0..3;          // input channel. XX = 2D/Cube
uniform vec4      iDate;                 // (year, month, day, time in seconds)

// Main funtion
void mainImage( out vec4 fragColor, in vec2 fragCoord )
{
    // Normalized pixel coordinates (from 0 to 1)
    vec2 uv = fragCoord/iResolution.xy;

    // Time varying pixel color
    vec3 col = 0.5 + 0.5*cos(iTime+uv.xyx+vec3(0,2,4));

    // Output to screen
    fragColor = vec4(col,1.0);
}
Tutorial Notes
mainImage()
Image shaders implement the mainImage() function in order to generate the procedural images by computing a color for each pixel. This function is called once per pixel, and it is responsability of the host application to provide the right inputs to it and get the output color from it and assign it to the screen pixel.
fragCoord
fragCoord contains the pixel coordinates for which the shader needs to compute a color. The coordinates are in pixel units, ranging from 0.5 to (resolution-0.5), over the rendering surface, where the resolution is passed to the shader through the iResolution uniform.
iResolution Uniform and fragCoord Remapping
iResolution is a vec2 that provides the amount of pixels on x and y dimension of the display. Usually we use it to normalized the pixel coordinates:
vec2 xy = fragCoord / iResolution.xy;
so that the coordinates range:
\[[0.0, iResolution.x] \Rightarrow [0.0, 1.0]\] \[[0.0, iResolution.y] \Rightarrow [0.0, 1.0]\]And then, sometimes(eg. when building camera models), we also want to scale-offset it:
xy = xy * 2.- vec2(1.);
so that
\[[0.0, 1.0] \Rightarrow [-1.0, 1.0]\]And finally, because the display is rectangular with the width-height ratio iResolution.x/iResolution.y, we may always want to make the coordinates uniform with width-height ratio as 1:1:
xy.x *= iResolution.x/iResolution.y;
// or
xy.y *= iResolution.y/iResolution.x;
We can pack up all of them together to make a function like this:
vec2 arrangeCoords(vec2 p)
{
    vec2 q = p.xy/iResolution.xy;
    vec2 r = -1.0+2.0*q;
	r.x *= iResolution.x/iResolution.y;
    return r;
}

// Call in right away in mainImage
void mainImage( out vec4 fragColor, in vec2 fragCoord )
{
    vec2 p = arrangeCoords(fragCoord);
    //...
}
fragColor
The resulting color is gathered in fragColor as a four component vector, the last of which is ignored by the client. The result is gathered as an “out” variable in prevision of future addition of multiple render targets.
Code Compatibility
Sometimes I copy the Shadertoy GLSL source code offline to play around in Atom Editor or Kodelife. Here are some of the minor changes needed to make sure the shader compiling fine of all kinds of IDE.
Kodelife
KodeLife is an amazing live shader programming tool and sometimes I use it to work offline.
To start with, make sure creating new project from Shadertoy Template. It comes with these boilerplate code.
#version 150

in VertexData
{
    vec4 v_position;
    vec3 v_normal;
    vec2 v_texcoord;
} inData;

out vec4 fragColor;

////////////////////////////////////////////////////////////////////////////////
////////////////////////////////////////////////////////////////////////////////

uniform vec2 iResolution;
uniform float iTime;
uniform float iTimeDelta;
uniform int iFrame;
uniform vec4 iMouse;
uniform sampler2D iChannel0;
uniform sampler2D iChannel1;
uniform sampler2D iChannel2;
uniform sampler2D iChannel3;
uniform vec4 iDate;
uniform float iSampleRate;

void mainImage(out vec4, in vec2);
void main(void) { mainImage(fragColor,inData.v_texcoord * iResolution.xy); }

////////////////////////////////////////////////////////////////////////////////
////////////////////////////////////////////////////////////////////////////////
Simply copy-paste Shadertoy code under all of them to run the shader in KodeLife.
Atom Editor
I’m using plugin GLSL Preview package for live GLSL programming.
The following default uniforms are available.
uniform vec2 u_resolution; // size of the preview
uniform vec2 u_mouse; // cursor in normalized coordinates [0, 1)
uniform float u_time; // clock in seconds
The variants iResolution, iMouse and iGlobalTime can also be used for legacy reasons. So, after paste the Shadertoy code, add the following code at the beginning to setup the basic uniforms:
uniform vec2 iResolution;
uniform vec2 iMouse;
uniform float iGlobalTime;
float iTime = iGlobalTime;
Then change function void mainImage( out vec4 fragColor, in vec2 fragCoord ) to void main(), and for the whole shader:
- change
fragColortogl_FragColor - change
fragCoordtogl_FragCoord
END